
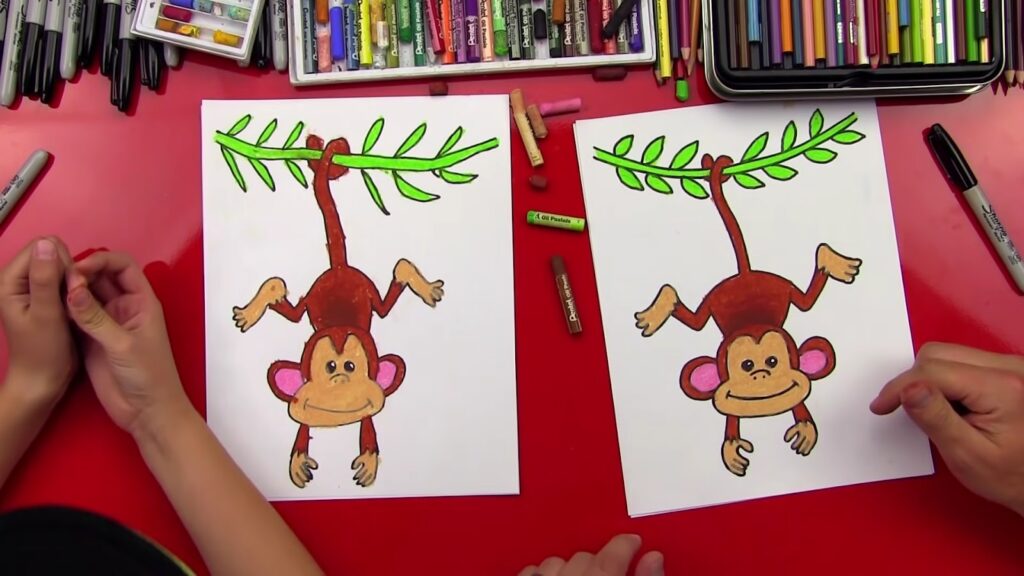
Engaging in the art of cartooning embodies a delightful and imaginative pursuit, providing a wonderful avenue for expressing creativity and ingenuity. Among the plethora of characters cherished by artists, the endearing and mischievous monkey stands out as a favorite. Possessing a repertoire of expressive traits and a vivacious demeanor, the depiction of a cartoon monkey promises to infuse both the creator and the viewer with sheer delight. Within the confines of this instructional manual, we shall embark upon a systematic journey, unraveling a straightforward approach to sketching your personalized cartoon monkey.
Artistic Tools You’ll Need:
Creating an exciting and playful cartoon monkey isn’t as hard as it seems. To start off with this fun challenge, gather the following materials:
- High-quality drawing paper: Opt for sketching paper or a sketchbook that can hold up to erasures and heavy mark making;
- A reliable pencil: A general HB or No.2 pencil will work fine. However, for a varied range of line thickness, consider having a set of pencils;
- An efficient eraser: While any eraser will do, a kneaded eraser can be particularly useful since it can be shaped to erase small areas without affecting the overall sketch;
- Pen or marker: Optional, but effective for outlining and finalizing your drawing;
- Coloring materials: This is optional and can include colored pencils, markers, or watercolors to add a pop of color to your monkey cartoon.
Step One: Sketch the Foundational Shapes
Kick off your creative journey with the basic shapes that will form the underlying structure of your cartoon monkey. This is a critical step in developing the overall proportions and placement of the monkey’s features. Here’s how to proceed:
- Start with an oval-shaped sketch for the head. It’s crucial to keep this light and not too hard. This initial sketch acts as a guideline that will be erased later on;
- Next, create a larger oval for the body, ensuring it’s proportionate to the head. Remember, in cartoon illustrations, it’s usually acceptable to exaggerate the proportions slightly for a funnier or more dramatic effect;
- Link the aforementioned shapes using two gently curved lines, forming the neck of the monkey.
Keep in mind that these shapes are merely guidelines. You are allowed to play around with them until you find the shape and structure that pleases you! The key is to draw lightly, make adjustments, and maintain proportions. Happy sketching!
Step Two: Bring the Face to Life
Moving forward, the face is arguably the most important aspect of any cartoon character, providing not only personality but also delivering various emotional cues. Follow these steps to create an inviting and friendly cartoon monkey face:
- Begin by drafting two sizeable circles for the eyes. Make sure to maintain a reasonable space between them to accommodate other facial features;
- Add smaller circles within the eyes to act as specular highlights, adding life and sparkle to your monkey’s eyes. This small detail can greatly contribute to making your drawing look more professional and lively;
- Beneath the eyes, form a cheerful smile by drawing a curved line. This not only adds to your character’s charm, but it also helps to convey a playful and positive demeanor that is central to cartoon animals;
- Above the smile, sketch a small oval or a softly rounded triangle to illustrate the nose. Remember, in cartoon drawings, the nose doesn’t need to be anatomically perfect—simplicity is key!
Step Three: Rendering Ears and Hair
In this step, you will add more character to your monkey by fleshing out its ears and hair. Here’s how:
- From each side of the head, draw out two curved lines upward to shape the monkey’s ears. Pay attention to their size and placement—they should be high enough and proportional to the head;
- On top of the monkey’s head, introduce some curved lines to depict the hair strands. This could be as neat or as tousled as you like, adding to the cartoonish charm of your monkey.
Step Four: Construct the Arms and Hands
In this stage, you will breathe more life into your cartoon monkey by constructing the arms and hands. Follow these steps:
- From each side of the monkey’s body, design two curved lines that project outwards to construct the monkey’s arms. These should follow the natural flow of the monkey’s body, providing a sense of motion and dynamism;
- To draft the hands, draw ovals at the end of each arm. This forms the base for the hands;
- Finally, introduce the fingers by sketching short, curved lines. In a cartoon monkey, three or four fingers (including the thumb) are generally adequate.
Remember, practice and perseverance are your best friends on this artistic journey. Keep refining and iterating until you’re happy with your result!
Step Five: Sketching the Legs and Feet
A cartoon character’s charm often lies in their exaggerated or stylized features, and our cartoon monkey’s legs and feet are no exception. Let’s conquer this step:
- From the base of the monkey’s body, outline two gently curved lines outwards to craft the legs. Think about the stance you desire for your monkey and adjust the position and angle of the legs accordingly;
- At the end of each leg, draft larger ovals to represent the feet. This will provide a solid base for your monkey and enhance the overall balance of your drawing;
- Lastly, add a touch of detail by sketching short lines within the ovals, representing your monkey’s toes. For a more authentic look, you can also add some curves on the legs and feet, indicating the monkey’s muscle structure or fur.
In cartoon drawings, it’s essential to maintain a balance between maintaining anatomically correct proportions and introducing elements of fun and exaggeration.
Step Six: The Quintessential Tail
The tail is an indispensable part of a monkey’s persona, often used to express its mood and complement its actions within the drawing. Let’s see how to bring this essential part to life.
- From the back of the monkey’s body, project out a long, curved line to shape the tail. The tail’s length and curve are entirely up to you, but remember, in nature, monkey tails are often long and flexible;
- To add more realism and depth, include a few slightly curved lines along the tail. This not only provides a sense of movement but also adds texture to the tail, making it visually more appealing.
The tail, moving fluidly with a life of its own, is a significant aspect of a monkey’s identity. So, never overlook this feature when drafting your cartoon monkey!
Step Seven: Putting on the Finishing Touches
Having created the overall structure, it’s now time to refine your drawing, making adjustments and adding those all-important final details that will bring your cartoon monkey to life.
- Clean up your drawing: Erase any unnecessary guidelines or lines that were previously made. This includes the initial guidelines sketched for the head, body, arms, and legs;
- Define and adjust the proportions: If you spot any areas where adjustments are needed—for instance, an arm is too long or the ears are too small—now is the time to make those changes. Remember, your objective isn’t to create a hyper-realistic monkey but rather a charming, stylized cartoon version;
- Add finer details: Now let’s make your monkey more expressive by adding small details such as eyebrows, fur texture, or even clothes if you wish! Adding eyebrows, for example, provides a great way to express your monkey’s current mood, whether it be happy, surprised, or even a little mischievous;
- Be mindful of the fur texture: Keep it simple, you don’t have to draw every strand of fur. Hinting the furry texture with some gentle strokes around the monkey’s body should do the trick.
Step Eight: Bring Your Cartoon Monkey to Life
With the refined sketch in hand, it’s time to finalize your drawing and add colors, bringing your cartoon monkey to life.
- Outline your drawing: Using a pen or a marker, trace over your pencil lines to create a crisp, professional-looking outline. During this process, feel free to correct any errors or make final improvements;
- Add color: Breath life into your monkey with some vibrant colors. You might opt for traditional monkey colors like varying shades of brown, or you could go wild with any color combinations of your choice! Whether you choose crayons, colored pencils, or markers, adding color is a fantastic way to enhance the visual appeal of your monkey;
- Add shading and highlights: For a more three-dimensional look, incorporate shadows and highlights. This will give your drawing a greater sense of depth and volume, making it stand out.
By following these steps, you’ll have mastered the art of drawing a cartoon monkey. Remember, practice makes perfect, so keep drawing, refining your technique, and most importantly, have fun with your new creative skills!
Conclusion
Crafting a cartoon rendition of a monkey presents an enjoyable and fulfilling endeavor, accessible even to novices. Through adhering to these uncomplicated guidelines and allowing your imaginative juices to freely flow, you can fashion your unique and endearing simian persona. Regardless of whether you’re casually doodling for amusement or delving into your artistic abilities, keep in mind the adage that proficiency comes with practice. Thus, seize your pencil and parchment, initiating the creation of your personal cartoon primate without delay!